
I have the duty to lift the secret off of the recent Dawn in the Forest images. To me an image has to speak its own language and communicate with the viewer, and how that conversation gets started doesn't matter. A lot of comments on that post read: magical, dreamy, secluded, spooky etc. And that was the goal!
In the case of all the images in that post, they were taken midday! And the dark, moody, blue and green undertones were added in post-production. That's where this tutorial comes in.
This is a comparison between the daylight version and the edited version.

There are a few ground rules that must be established first when it comes to day to night conversion. You can't change any daylight image into night and have it work. There are three simple rules that must be obeyed when taking the image:
1. Always shoot in the shade, not in direct sunlight2. Never shoot the sky3. Shoot in RAW mode of your dslr camera
This whole method will cover RAW files, and editing in Photoshops Camera Raw application. Editing simple JPEG images will not really make this work, but you can certainly try it.
Step 1
Open your RAW file image in Photoshop

Step 2
Edit the RAW file
Now when it comes to this, you can and will have to apply most of the filters. I'll list down what I had to change.
Temperature: Down to 3850 (Make sure this is the cold blue spectrum of the Temperature slider)Tint: +38 (For this image it helped to turn it into the magenta spectrum)Exposure: -2,20 (This, besides the Temperature is the main filter, slide it down into the darkness)Highlights: -100 (Turn them down completely. This will tone down and bright spots in the image that come from daylight)Shadows: +83 (Since you turned down the Exposure and Highlights, the image will seem too dark, slide this up to make the details of the image more visible)Whites: -100 (No bright whites during night, slide down completely)Clarity and Vibrance: I played a bit with these two sliders just to enhance the effect. Sliding down Clarity makes the image softer which works nicely for the night, and by moving the Vibrance up the colors pop out without being too saturated. Definitely play around with these two.
All of these changes are visible in this next screenshot. Click on it to enlarge.

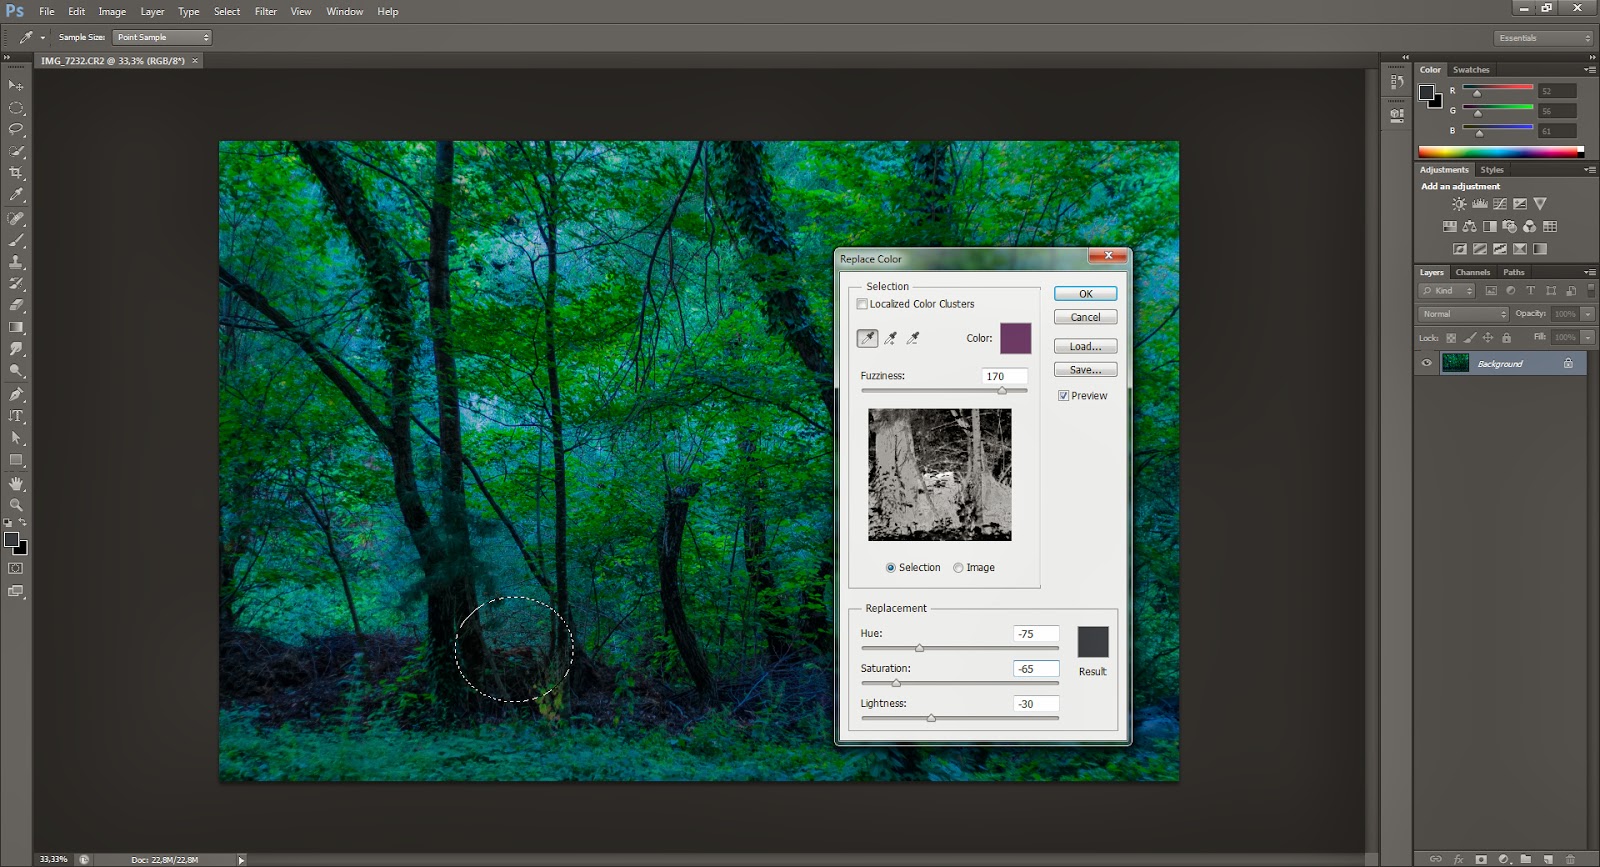
Click on OK. You can very well end here, as the effect is created. As you can see in my example, the conversion left a red object behind (by the left trees), which didn't look right. If you have any unwanted colors left, move over to Step 3.
Step 3
Remove any unwanted, left-over, colors
Select the Elliptical Marquee Tool (or press the letter M on your keyboard while Photoshop is opened) and make sure to set the Feather to a nice soft 50. Circle around the color that you want to remove.

3.1: Select Image > Adjustments > Replace Color

3.2: The Eyedropper Tool will automatically be selected. Use it, and click on that spot of your image where the unwanted colors is located.

3.3: Don't be alarmed if the color doesn't match perfectly, the Eyedropper Tool selects color by pixels, and you'll never be able to get it 100%. But it will suffice.
Now use the Hue, Saturation and Lightness Sliders in the Replace Color Dialog box to change the color and match it to the rest of the image. See that screenshot that follows to see what I have done.
Once your done click OK.
Step 4
Save your Image
File > Save as...
This is the end product of the conversion. For more examples of day to night conversion check out my recent post.

I hope this was interesting to read. If you decide to make this yourself, please let me know, would love to see your images. As always, if you have further questions let me know in the comments below. Thank you for stopping by.


![Moody Summer at our Mountain Cottage [Through My Lens Nr. 148]](https://blogger.googleusercontent.com/img/b/R29vZ2xl/AVvXsEgHycg0HtoCCzHcq71Q2N4wCjtcNWoJ_oGvQW6eVg9ZJmY880RqsQVbxQ_Pdhxi-9vhpozVC3DS4SSwUywFmESxsh5c2eOeBdxjTmCzrlhSh4pIMUtfL3YhW0teo2DXRNR7HpoYikapNdY/w72-h72-p-k-no-nu/IMG_20180617_105811_772.jpg)


![Visiting the Liseberg Amusement Park [Part 3]](https://blogger.googleusercontent.com/img/b/R29vZ2xl/AVvXsEi8NM-yrujAxh_Rfb5e2yGly7NyVg_PKibzegbjhLL3kr1lPV4MdAtB43wUuulWem62OoupXnV60bJBfvDIxY9Gq05g7Ria5ooKAIVT6DDn1AYO6EN1JRBDp8CZPBCD-kL9sF53rUTEKMo/w72-h72-p-k-no-nu/IMG_74.jpg)

i love the change in it and thanks for the tutorial.. I don't shoot in raw, have no idea how so might try this in jpeg
ReplyDeleteAlso, I don't know if you'll be able to do all the tweaking in a JPEG. Let me know if you try it.
DeleteWhat camera do you have. It's usually accesible through the menu of your camera and is very easy to find.
ReplyDeleteHi Mersad great effect, thanks for sharing
ReplyDeleteMersad, your photography is great and tutorials are wonderful. I always try not miss your tutorials. I hope you continue to do them.
ReplyDeleteThanks so much. You can find all of the tutorials listed in the menu on the top of the page!
DeleteGood tutorial! I don't shoot in Raw, but I like seeing what you did with the photo.
ReplyDeleteMaybe you could try it. It has it's benefits.
DeleteGreat tutorial, thanks for sharing! Lovely photos! Have a great weekend!
ReplyDeleteYou too. Thanks for stopping by.
DeleteYou are very good at giving tutorials, Mersad. Thank you so much for sharing. I have a Polaroid digital...nothing fancy, but it is good for me and the price was right.
ReplyDeleteGreat. I started with a small consumer camera myself.
DeleteYou are very good at giving tutorials, Mersad. Thank you so much for sharing. I have a Polaroid digital...nothing fancy, but it is good for me and the price was right.
ReplyDeleteLooks like fun. I will have to try it when I get the chance. Thanks for sharing.
ReplyDeleteThanks for reading.
DeleteGuten Morgen Mersad...
ReplyDeletewieder mal ein cooles Tutorial ... Und man kann immer wieder was lernen :)
Ich wünsche Dir ein schönes WE
LG
Wünsch Dir auch ein schönes Wochenende.
DeleteI learn something every time I visit your blog. Thank you.
ReplyDeleteThank you Valerie. I hope you are well!
DeleteI always love visiting you because I know I am going to find something beautiful and interesting...Thank you so much for this tutorial. I am definitely going to try because I really like the effect you were able to achieve....
ReplyDeleteThank you for your comments; you are always so kind and encouraging....
Thank YOU for your kind comments. Love reading from you. :)
Deletegreat tutorial and such gorgeous photos, mersad.
ReplyDeletethanks so much for sharing and have a lovely weekend~
:)
Thanks Betty.
DeleteWOW! Thanks for sharing! I never thought we could do that. Good work.
ReplyDeleteHope you'll try it out!
Delete