
A shallow depth of filed is a very common and attractive way to add a sense of dimension in images. You can mostly find it in macro shots, close-ups and portraits. In this post I want to talk about a different side of depth of field, and that's depth in landscape shots.
click on the images for a bigger view
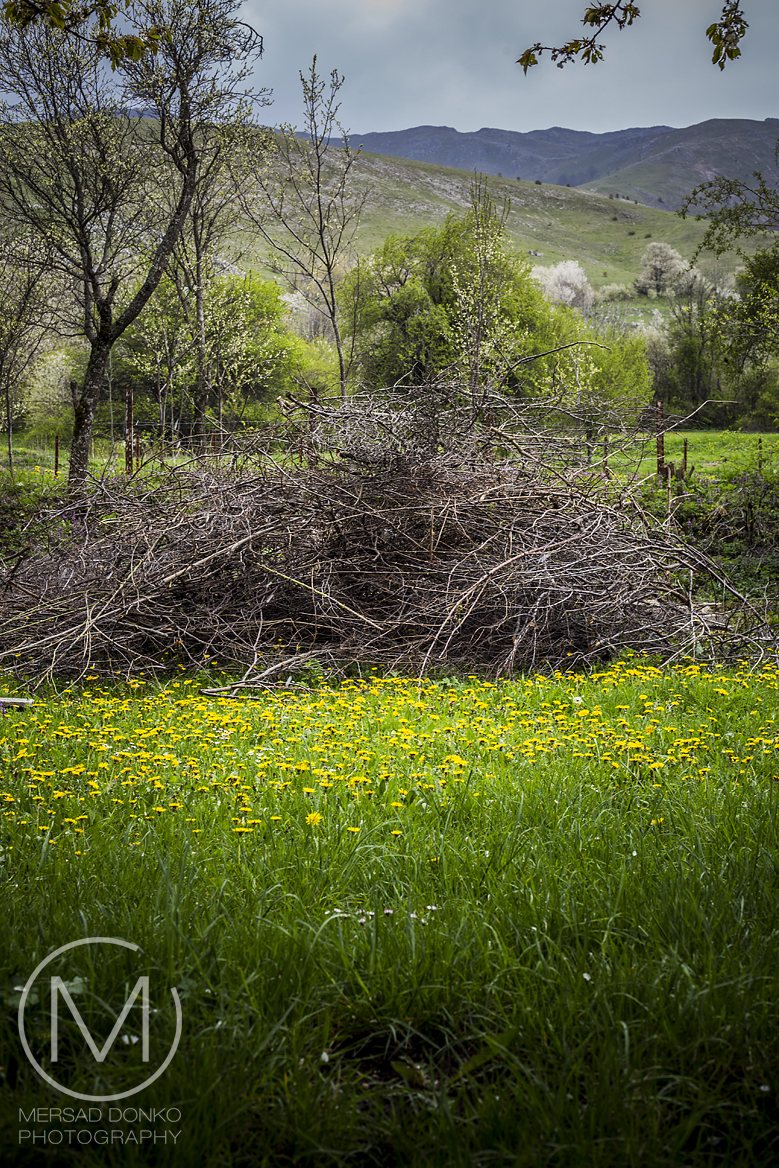
Here is a side by side comparison of the same shot with a wide depth of field (left) and shallow depth of field (right). It's the same view, but the shallow depth of field adds more interest to a specific aeria of the image.

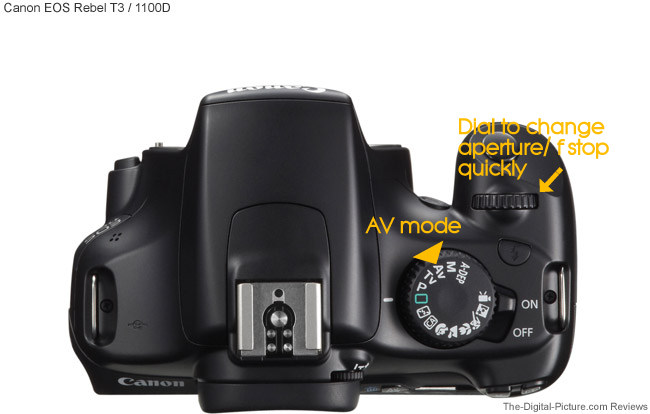
The trick to getting these types of shots in camera is to use the Av mode on your dslr camera. The Av mode controls the aperture of your lens.

On canons, you switch to Av Mode by sliding the dial to "Av", and then you use the round dial on the front of the camera (picture below), to set the aperture.
If you set it to a high number like 11 and above you will get crisp images, like the version below.
But here is the trick. If you set it to a small number like 1.8, 2, even 3, and then focus on a specific aeria of your image, and take that shot, only the focused part will actually stay in focus. Everything else will be blurry.

I am not saying that this is the way to go with landscape photography, but it does create a nice effect in your images. That's why I thought I would share this quick and simple method.
Of course, this method works the other way around as well. For crisp and sharp landscape shots, use a high aperture number. That way you can get sharp shots like the one that follows.

Thanks for stopping by. I hope you enjoyed this quick tip, and I also hope it'll inspire you on your next photo session!


![Moody Summer at our Mountain Cottage [Through My Lens Nr. 148]](https://blogger.googleusercontent.com/img/b/R29vZ2xl/AVvXsEgHycg0HtoCCzHcq71Q2N4wCjtcNWoJ_oGvQW6eVg9ZJmY880RqsQVbxQ_Pdhxi-9vhpozVC3DS4SSwUywFmESxsh5c2eOeBdxjTmCzrlhSh4pIMUtfL3YhW0teo2DXRNR7HpoYikapNdY/w72-h72-p-k-no-nu/IMG_20180617_105811_772.jpg)


![Fall in Bosnia [Part 1/3]: Visiting Busko Blato](https://blogger.googleusercontent.com/img/b/R29vZ2xl/AVvXsEhOBgL8Y9XO8kojOEuAeMEV_lzOiv5ifqoS7fNci_S-jcdMuWCU_oQ06aa0VrzoEDuuSRl6XQAr_a95gbleaTe3n8SDgNYlkdtsDmSZJYbcPIPfQdghEgpKW3cmolHwzUfhyphenhyphenaUtcL9ECgxr/w72-h72-p-k-no-nu/IMG_19.jpg)

![Visiting Stolac [Part 1/3]: Stećci in Radimlja](https://blogger.googleusercontent.com/img/b/R29vZ2xl/AVvXsEhuviPcdE0xNsxtIddLe2FDNBH5v34HNuy2GY5vHmkdOqN6g9gU7lAfLd0XPPULojFVVEMclfU8nEqS6lcBJsT9Sv2y64dQeo-TZXR2CPy2Vgor3c7cOMzh2faZ9GF0ZSvvVQSq_J7cWhn6/w72-h72-p-k-no-nu/IMG_01.jpg)
![Pigeon Point Lighthouse on the Pacific Coast Highway [5/15]](https://blogger.googleusercontent.com/img/b/R29vZ2xl/AVvXsEjsArNCWBcOZV5YArXesAWL-HQaw9Coz7G7kzvZGc06SS-YdU2gNRpMp6YJ24kCcfTbevO-GMXrlfdFyzVjMoSa_8RM9qwmPJ5z8p69odYOrJc0ULbYh-dqgIuz07GBWUg7dHCk4CTLj_4/w72-h72-p-k-no-nu/IMG_114.jpg)


Thanks for the lesson on depth of field control. It works for macro photography as well. Use of a large aperture gives a narrow sharp focus depth to emphasize the subject of the photo. I like the examples you used. I often set my aperture at f11 and let the shutter speed vary, but that's just my style.
ReplyDeleteThat's right. It's very simple, but very effective thing to remember.
DeleteHi Mersad. Thank you for sharing this tutorial. Depth of Field is one thing I always have trouble with. I'm guilty of using the "auto" settings on my cameras most of the time. This was very informative and helpful.
ReplyDeleteThe Av mode is semi-automated. You control the depth of field with it, and the camera does the rest. You should try it. It's very easy.
DeleteI usually rely on auto setting, but I had a go. I followed your instructions and achieved various effects. Thank you, I shall go out and practice right now.
ReplyDeleteThat's really good to hear. I hope you'll come back with lots of great shots.
DeleteMersad, I am happy with landscapes. I like sharp front to back. I enjoy wide angle shooting and I just love the new Canon tilt shifts. They do take an hour to work the first time but once you get the feel of the lens they only need a little nudge of tilt at f9/f11 and if you have them set up on a panoramic head you can shift sideways for a perfect panorama. Having said that when I posted the very intermittent Bluebells. I used a telephoto on f 4 and focussed one bunch in. I agree with what you say but it is hard for people shooting with I-pads or compacts. The sensor size makes a hell of a difference. I have a medium format Bronica on film. I tend to set up with the Canon and then let the Bronica have a go. I will, sometime, post the same view through both. I should say a similar view. As all good landscapes take time, a tripod and yet more time. The light is never perfect.
ReplyDeleteI enjoyed this but I am a silly old man who spends enough money on used cameras to buy a second hand Porche.
This is just another option, people may have not realized or are not used to. As i wrote, if you want to have the traditional sharp front-to-back landscapes (as I want them always to be), then you will need a high aperture number. This here is an artistic rendering, an idea, something that can make you think outside the box. Conformity to rules of photography is great (i play by the rules too), but breaking them is important as well, because it creates room for something new and unseen. I love your landscape images, and could only wish to have money on the Porsche level, to spend on gear. I would do it in an instant. :)
DeleteThanks for this tutorial, Mersad! I hope I can make good use of it!! Hope your week is going well!!
ReplyDeleteI hope you do. Thanks for visiting.
DeleteSimple explanation but so clear, ever good tips
ReplyDeleteThanks
Stefano
Your comment to Adrian says volumes.. Break rules and think outside the box.
ReplyDeleteTake chances and take scads of pictures!
Your tutorial is great, very clear and easy to follow. I must confess I never take my Canon off manual, I like complete control. But then I've been in photography since the dark ages.
Your posts are always great.. I always look forward to reading them!
Thank you Laura. Manual mode is my usual mode as well, but I do use Av for portraits.
DeleteThank you for this tutorial!
ReplyDeleteThanks Michelle.
DeleteVery easy to understand and informative tutorial. Always enjoy your photos, too.
ReplyDeleteThanks!
DeleteNice straightforward tutorial and the sample pictures you used were perfect examples.
ReplyDeleteThanks Paul.
DeleteMersad, that is EXACTLY what I wanted to know. Thank you. I also think it's fun to focus on something random within the landscape. So, thank you for that tip too.
ReplyDeleteThis is a brilliant blog! I'm very happy with the comments!.. Rafeeg
ReplyDeleteAppreciate you sharing great article post. Great.riverside ca landscaping
ReplyDeleteAs with Landscape Architects, the title does not necessarily signify talent. The education, experience and ability among landscape designers varies considerably. hardscaping terrell tx
ReplyDeleteThanks for sharing this information. I really like your blog post very much. You have really shared a informative and interesting blog post with people.. rapid city sd mowing company
ReplyDeleteThey will be able to evaluate the data collected on site and produce a scale drawing at 1/8 or 1/4 inch scale to accurately portray the site's characteristics. Working with a simple client brief students will produce a sketch proposal based on that brief . Landscaping Dallas TX
ReplyDeleteRajasthan Travel
ReplyDeleteThe magic of Rajasthan is unparallel inside the global for its historical past, lifestyle, safaris and sand dunes. Rajasthan is the land of Kings. It depicts the tale of the top notch warriors and their chivalry, their romance, glory and tragedy. With invincible forts, stunning palaces and serene lakes Rajasthan is surely called a land of valiance .
Rajasthan is colorful, colourful, noticeably appealing & actually impossible to resist. The magic of Rajasthan is unparallel in the global for its historical past, way of life, safaris, sand dunes and lush inexperienced forests with its flora and fauna. Rajasthan is likewise acknowledged for the satisfactory handicraft, earrings and textiles produced by way of skilled conventional craftsmen. The main sights of Rajasthan's natural world are --the majestic elephant, the dance of the peacock, the camel stride, the roar of the tiger and many others. Besides camel safaris throughout the Thar Desert, paying attention to the folk track and enjoying folks dances within the nights are an experience that you could never overlook. And the important attraction of Rajasthan is its elegant forts and palaces.
Rajasthan, a land of princes, palaces and is renowned for its monuments, art and lifestyle that cross back to numerous centuries. Rajasthan with a treasure of history, picturesque architecture and bewitching panorama is an remarkable vacation spot on the traveller map of India.
Rajasthan Travel Tour is an internet travel portal devoted to the tourism of Rajasthan. Its a one forestall answer for all of your journey desires, whether it is related to any records concerning rajasthan or reserving of tour packages. A range of Rajasthan excursion operators are registered with our portal and travel enquiries generated via the portal is entertained via them.
The Desert Safari in rajasthan has emerge as a popular circuit with the travelers. One of the essential questions whilst taking on a Rajasthan desert safari is the destinations to be protected. Rajasthan wilderness Safari takes you thru breathtaking sand dunes with pleasant parents, camping on the solitary oasis, enjoying the darkish starry nights and jiving to musicians playing a haunting, stringed tool.
Find Optimum Web Development Solution at JustWebDevelopment with reliability, affordability, effectiveness and Suitable Web Solution by expert Web Developer. Shopify app development
ReplyDeleteNature's beauty at its finest. new website
ReplyDeleteHome builders always bring dreams alive. custom home builders bluffton sc
ReplyDeleteLoved the way they combined modern and natural elements. Brisbane Landscaper
ReplyDeleteThe top landscape company in Newmarket,ON is Edens Landscape Design, trusted experts.
ReplyDelete